Using Civil 3D, memory management is very important. There are techniques you can utilize that will optimize your system resources by minimizing your memory use.
Indexing a reference drawing
Turn on Demand Loading using XREFCTL. Either set it to 1 or 2. 1 means that your Xref's are loaded and locked in their home path; 2 makes a copy of the Xref on your local workstation and that copy is loaded and locked, still allowing others to open and edit the Xref drawing.
INDEXCTL (stands for Index Control) is an AutoCAD command, used with the reference drawing open, that will index your drawing objects by layer and/or spatially. The advantage is that when you reference this drawing into another, objects that are on frozen layers will not be loaded into memory. Set INDEXCTL to 3 in the reference drawing to turn on both layer and spatial indexing.
XCLIP is the command you use, inside the container drawing, that will not only clip your Xref visually, but will also reduce its memory footprint by not loading those objects that lie outside the XCLIP boundary. To utilize layer indexing, simply freeze Xref layers in the container drawing. Be sure you leave VISRETAIN set to 1.
Civil 3D Surface Data Clip Boundaries
To reduce the memory footprint of a Civil 3d Surface, use the 2009 version's new Data Clip Boundary feature. If your surface data area is larger than the area of concern for your project, you can benefit. Just draw a polyline to delineate the extents of your project.
The Data Clip Boundary must be the first data operation in your surface properties, so you would normally apply this boundary before adding other data. You CAN go back and move the data clip boundary to the top of the build sequence later, but it has to be on top or it won't be applied to the surface.

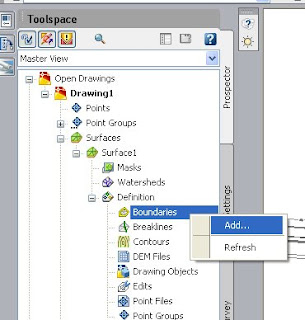
To add the boundary to a surface that has just been created, on the Prospector tab, go to Surfaces. Find and expand the newly created surface, expand Definition, right click Boundaries and select Add...

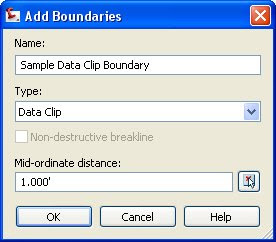
Set the boundary Type to Data Clip, press OK, and select the polyline that represents your data clip.
From here, create your surface as you normally would. The only difference is that any data outside the data clip boundary will be completely ignored and will not be loaded into memory when Civil 3D loads the surface. This feature will save you time and reduces crashes.
Saving memory when using Feature Lines
If you extensively use feature lines, knowing that they are continually looking at one another to detect crossings will help you understand why it can be helpful to place feature lines in different Civil 3D Sites.
When you go to edit, offset, move, or otherwise change a feature line, all the possible crossings of all feature line segments in that site must be checked by the program and that takes a lot of memory. Moving a feature line to its own site, can make functions that take many minutes take only seconds.
 To move a feature line to another site, in the drawing window, select the feature line, right click, and select Move to Site
That's the end of Tim's first Civil 3D Blog entry. More to come...
No comments:
Post a Comment